IntroducTIon
With its numerous features, the MAXQ2000 can create a mulTItude of useful applicaTIons, such as controlling a fan's speed by pulse width modulation (PWM). Among the many features of the MAXQ2000 are its timer with PWM and Serial Peripheral Interface (SPI™) and 1-Wire® capabilities. This application note describes how the MAXQ2000 can be used to drive a fan and change its speed, in real time, by PWM. This process requires the use of another Maxim product, the MAX1407 multichannel data-acquisition system (DAS). Using SPI, the MAXQ2000 can communicate with the MAX1407 (containing a 16-bit analog-to-digital converter [ADC] and digital-to-analog converter [DAC]). As an alternative to using a thermistor, the MAXQ2000's 1-Wire bus master can be used in conjunction with a temperature iButton (DS1920). The source code used in this application note is available for download.Overview
This program runs on the MAXQ2000 evaluation kit (Rev. B), with the help of a temperature iButton (DS1920), or an external thermistor. The MAXQ2000 evaluation kit (Rev. B) includes an LCD display, two pushbuttons, a MAX1407 ADC, two UARTs, three timers, 1-Wire, and many other features. The program uses the LCD display, the pushbuttons, and the MAX1407 or 1-Wire for reading the temperature. In addition, a DC fan and applicable drive circuitry, a thermistor, and a power supply will also be needed. The MAXQ2000 evaluation kit will drive an external circuit to control the fan speed. The LCD display shows current temperature, and changes periodically from Celsius to Fahrenheit. The pushbuttons allow the user to change the low- and full-speed temperature thresholds for the fan.The default method to detect the temperature is through use of an iButton, but if the correct iButton is not available or there is a problem in communication, the program uses a thermistor through the MAXQ2000's SPI to get the temperature reading. The iButton (DS1920) is a temperature-sensing 1-Wire device. The program uses an RL1005-5744-103-SA thermistor in conjunction with the MAX1407.
Once the temperature is read, the display is sent to the LCD, and the PWM duty cycle is adjusted based on the temperature reading.
There are two thresholds in the program, the minimum temp and the maximum temp. If the temperature is below the minimum temperature threshold, the fan turns off; if it is above the maximum temperature threshold, the fan is set to its maximum speed. If the temperature is between the minimum threshold and the maximum threshold, the speed is proportional to the fractional distance between the two temperature thresholds.
The two thresholds are configurable through the two pushbuttons labeled SW4 and SW5. SW4 toggles the threshold to change—either base or maximum. The threshold selected for the change is shown between the numerical data and the C/F character. An underscore states that the base threshold will be changed, while an overscore means the maximum threshold will be changed. SW5 increases the currently selected threshold by 1. Each time one threshold is changed, the fan speed is recalculated.
This application requires using two of the three timers on the MAXQ2000. Timer 1 is devoted to periodically checking the temperature through the thermistor, while Timer 0 uses the PWM output from P6.5 to control the fan. Timer 1 cannot be used for the PWM because it has hardware resources that are used during communication with the MAX1407.
Hardware Setup
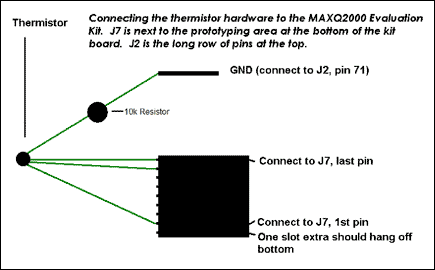
Figure 1. Connection of the thermistor hardware to the MAXQ2000 evaluation kit.
First, construct the thermistor setup using a RL1005-5744-103-SA thermistor and a 10kΩ resistor. This is done by first connecting J7 pins 7 and 8 to one side of the thermistor. To the other side of the thermistor connect a wire from pin 1 of J7. Next, connect the 10kΩ resistor between pin 1 of J7 and ground (pin 71 or 72 of J2 is ground). If the iButton option is being used, then the iButton should be placed in an iButton clip DS9094FS (or something similar) which should be soldered onto the 1-Wire section of the board. Next enable the pushbutton by switching on SW6.2 and SW6.5. The LCD display is connected to J3. In order to read the temperature through the thermistor, turn on all of SW3, which enables communication with the MAX1407. The ADC portion of the MAX1407 converts the analog signal from the thermistor into a digital value can be used to calculate the temperature. The use of an iButton requires jumpers on JU7 and JU8 and an iButton clip.
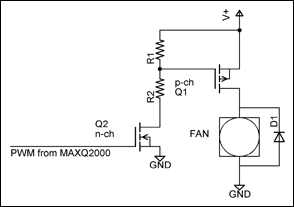
Figure 2. A possible hardware setup for connecting the PWM output to the fan.
Explaining the Software Definitions and Includes
#define PWMFREQ 1000         // Change this for desired PWM frequency
#define CPUFREQ 13500000     // Change this to match current clock
                             //    frequency
#define MIN_TICKS 0          // Minimum number of timer ticks
                             //    for fan to overcome static friction
#define POLLING_INTERVAL 500 // Number of milliseconds between
                             //    temperature checks
These are some basic definitions to be checked at compile time:
#define LCD0_PATTERN_C    0x039
#define LCD0_PATTERN_F    0x071

#define LCD_PATTERN_0     0x03F
#define LCD_PATTERN_1     0x006
#define LCD_PATTERN_2     0x05B
#define LCD_PATTERN_3     0x04F
#define LCD_PATTERN_4     0x066
#define LCD_PATTERN_5     0x06D
#define LCD_PATTERN_6     0x07D
#define LCD_PATTERN_7     0x007
#define LCD_PATTERN_8     0x07F
#define LCD_PATTERN_9     0x067

int PATTERNS[] = { LCD_PATTERN_0, LCD_PATTERN_1, LCD_PATTERN_2, LCD_PATTERN_3,
                   LCD_PATTERN_4, LCD_PATTERN_5,LCD_PATTERN_6, LCD_PATTERN_7,
                   LCD_PATTERN_8, LCD_PATTERN_9 };
The LCD display of numbers is incredibly easy using the above definition. The LCD patterns are predefined and then added to an array called PATTERNS for retrieval. Displaying a certain number is as easy as:
LCD2 = PATTERNS[desired_digit];
Timer 1 Initialization
  T2V1 = 0xFFFF - (CPUFREQ/128/1000*POLLING_INTERVAL);  // Set reload value.
  T2R1 = T2V1;                   // Set current timer value
  T2C1 = 0x00000;                // Set compare value
  T2CFG1_bit.T2DIV = 7           // Set Divide mode to Divide by 128
  T2CNA1_bit.TR2 = 1;            // Start Timer
  T2CNA1_bit.T2POL0 = 1;         // Set polarity high
  T2CNA1_bit.ET2 = 1;            // Enable timer interrupts
  T2CNB1_bit.T2OE1 = 1;          // Enable timer output
  IMR_bit.IM4 = 1;               // Enable interrupts from module 4
Timer 1 is responsible for periodically checking the temperature. The initial value (T2V1) is set depending on the length of time in milliseconds (POLLING_INTERVAL) between temperature polls. The reason the calculation is done on two different lines is to prevent the values from becoming too large for the registers to handle. The T2R1 specifies the value the timer returns to when it hits 65,535. T2C1 is set below the reload value (T2R0) to make sure that it does not ever generate an interrupt. T2CFG1 is the register that configures many of the timer options. The timer's clock divide is set to divide the system clock by 128, which means that every 128 cycles of the system clock is equivalent to 1 cycle of the timer. The system clock can also be divided, which then multiplies (in powers of 2) the amount of time for 1 timer cycle. T2CNA1 is the register for Timer 0 itself. This starts the timer running and enables timer interrupts while T2CNB1 enables the timer's output. Lastly, the interrupts from module 4 are enabled.
Timer 0 Initialization
  T2V0 = 0xFFFF - (CPUFREQ / PWMFREQ);    // Set current timer value
  T2R0 = T2V0;                            // Set reload value
  T2C0 = T2R0+1;                          // Set compare value to reload value +1

  T2CNA0_bit.T2OE0 = 0;	                   // Turns PWM output off
  T2CNA0_bit.T2POL0 = 0;                  // Changes polarity of PWM so it starts "off"
  T2CNA0_bit.T2OE0 = 1;	                   // Turns PWM output on
  T2CFG0 = 0x00;                          // Set timer divide at 1
The next item to be initialized is Timer 0, which controls the PWM and, through it, the fan. Timer 0 is a 16-bit timer exactly like Timer 1. When the timer hits the compare value (i.e., when T2V0 == T2C0) the port pin state is inverted. The port pin is also inverted when the timer reloads (Figure 3).T2V0 sets the initial value of the timer while T2R2 sets the reload value and both are set to 0xFFFF - (CPU frequency / PWM frequency). This calculation is used to make it easier to port the code to a system with a different CPU clock speed or to change the desired PWM frequency.
Figure 3. Port pin diagram.
Sub-option T2EO0 ensures the output for the PWM is off in order to change the polarity (T2POL0). When the polarity switch is set to 0, then the starting state for the PWM is off; as the diagram shows above shows. T2CFG0 ensures the timer is not dividing the system clock, and tells the timer to compare T2V0 against T2C0.
getADCReading is responsible for converting an analog signal into a digital value. The steps for reading the temperature from the thermistor are listed below.
  sendSPI(RD_ADC);                // Read the 1407's ADC register.
  spiData = sendSPI(0x0FF);
  spiData |= 0x01;                // Set the start conversion bit.
  sendSPI(WR_ADC);                // Write the new value back into
  sendSPI(spiData);               //   the 1407 register.

  do
  {
    sendSPI(RD_STAT);             // Read the 1407's Status register.
    spiData = sendSPI(0x0FF);
  }
  while((spiData & 0x02) == 0x00);  // Bit 1 indicates AtoD conversion complete.

  sendSPI(RD_DATA);               // Send the command to read the 1407's Data register.
  SPICF = 0x04;                   // Set up SPI to 16-bit mode.
  spiData = sendSPI(0x0FFFF);     // Read the Data register.
  SPICF = 0x00;                   // Put SPI  back into 8-bit mode.

  return spiData;
LCD Initialization
  //LCRA_bit.FRM = 7;   // Set up frame frequency.
  //LCRA_bit.LCCS = 1;  // Set clock source to HF/128.
  //LCRA_bit.DUTY = 0;  // Set up static duty cycle.
  //LCRA_bit.LRA = 0;   // Set R-adj to 0.
  //LCRA_bit.LRIGC = 1; // Select external LCD drive power.
  LCRA = 0x03E0;        // Do all configuration changes at once

  LCFG_bit.PCF = 0x0F;  // Set up all segments as outputs.
  LCFG_bit.OPM = 1;     // Set to normal operation mode.
  LCFG_bit.DPE = 1;     // Enable display.
  LCD1 = 0x08;
In order to display the current temperature you must turn on the LCD display. The first five lines are commented out of the code because they have been compressed into one statement. LCRA is the LCD adjust register and it controls the LCD display settings. Changing the FRM sets the frame frequency; with this you can lower the frequency and use less power. The frame frequency is the frequency of the power used to display on the LCD. LCCS changes the LCD clock divide to 128. Duty sets the display to static, which means that the display output never changes. LCFG is the LCD configuration register. Because the LCD only needs to display, changing PCF to 0x0F sets all the segments in the LCD as outputs. Setting OPM and DPE to 1 turns the LCD on and enables the display, respectively. LCD1 = 0x08 displaying an underscore, to signify that the pushbutton will increase the minimum threshold. With the two simple lines below, the LCD display is now active and ready to display.
LCRA = 0x03E0;
LCFG = 0xF3;
All that needs to be done is load values (like items in PATTERNS[digit]) into an LCD register, which is very quick and easy.
Pushbutton Initialization
  EIE1 = 0x84;                          // enable interrupts 15 and 10
  EIES1 = 0x84;                         // set up edge transitions
  IMR_bit.IM1 = 1;                      // turn on interrupts for module 1
Now it is time to initialize the pushbuttons. The interrupts tied to the pushbuttons are 10 and 15, which correspond to 4 and 80 (hex) on EIE1 (External Interrupt Enable 1). EIE1 enables those external interrupts while EIES1 (External Interrupt Edge Select 1) sets interrupt trigger as the falling edge (pushing the button down). If this is cleared to zero, releasing the button is the action that triggers the interrupt. IMR is the interrupt mask register, which keeps track of which modules from which to allow interrupts, and IM1 enables interrupts from module 1.
Pushbuttons Interrupt
The pushbuttons allow the user to change the base_temp and max_temp thresholds. SW4 (interrupt 10) changes the threshold that will be changed, while SW5 (interrupt 15) increases the threshold by 1. If the max_temp reaches 149, it lowers itself to base_temp+1. If the base_temp is one lower than the max_temp, the base_temp becomes 50.
#pragma vector = 1
__interrupt void pushButtonInterrupt()
{
  if (EIF1 & 0x04)  //interrupt 10     // Modify which threshold to changed
  {
    if(last_state == 0)                // Modify max_temp instead of base_temp
    {
      LCD1 = 0x01;                     // Change display to underscore
      last_state = 1;
    }
    else                               // Modify base_temp instead of max_temp
    {
      LCD1 = 0x08;
      last_state = 0;                  //Change display to overscore
    }
  }
The "#pragma vector = 1" is a compiler directive signaling that this function handles any interrupts from module 1, which is where the external interrupts originate.The pushButtonInterrupt function first checks to see which interrupt fired. Interrupt 10 is 0x04 and interrupt 15 is 0x80. If it were to change the threshold, then it changes the toggle and updates to the display. If it were the threshold incrementer, the threshold is increased by 1. If the threshold has reached its upper limit it wraps around to the lower boundary.
  if (EIF1 & 0x80)  //interrupt 15     // Increase threshold for base or max temps
  {
    if(last_state == 0)
    {                                  // Increase base_temp
      if(base_temp < (max_temp -1))
      {
        ++base_temp;
        if(base_temp > 99)              // If over 99, print 1 for 100's place
          LCD4 = 0x40;
        else
          LCD4 = 0;                    // Else print nothing
        LCD3 = getLCDDigit( (base_temp /10) %10);  // Print 10's digit
        LCD2 = getLCDDigit(base_temp %10);         // Print 1's digit
      }
      else if (base_temp == max_temp -1)         // If base temp is going to equal max temp
      {                                // set base temp to 50 instead of increasing
        base_temp = 50;
        LCD3 = getLCDDigit(5);         // Print 50 to display
        LCD2 = getLCDDigit(0);
      }
    }
If the threshold value is being modified, it checks the value of last_state. When last_state is zero, base_temp is modified; otherwise max_temp is modified. If the base_temp is exactly one less than max_temp, the program wraps base_temp to the arbitrary value of 50.
    else if (last_state == 1)          // Increase max_temp
    {
      if(max_temp < 149)
      {
        ++max_temp;
        if(max_temp > 99)
          LCD4 = 0x40;                 //show 100s digit
        else
          LCD4 = 0;
        LCD2 = getLCDDigit(max_temp %10);  // Show 1s digit
        LCD3 = getLCDDigit( (max_temp / 10) %10);    // Show 10s digit
      }
      else
      {
        if (max_temp == 149)           // If max_temp is at limit then cycle
          max_temp = base_temp+1;      // to be 1 degree over base temp
        if(max_temp > 99)
          LCD4 = 0x40;                 // Clear 100s digit
        else
          LCD4 = 0;
        LCD2 = getLCDDigit(max_temp %10);  // Show 1s digit
        LCD3 = getLCDDigit( (max_temp / 10) %10); // Show 10s digit
      }
    }
    xplier = ( (CPUFREQ/PWMFREQ) / (max_temp - base_temp));  // Re-calculate multiplier
  }
  EIF1 = 0;                            // Clear External Interrupt Flag
This part of the pushbutton interrupt changes the threshold of max_temp. It increases max_temp until it equals 149, then it wraps around to become 1 larger than the base_temp. If base_temp is 65 then max_temp would be 66.The newly increased/wrapped value is displayed briefly on the LCD so the user knows it has changed. The LCD changes back to the temperature the next time the timer reloads and updates the display with the temperature.
After the thresholds have been changed, the xplier is recalculated. xplier is the multiplier that determines the value of T2C1. Right before the pushbutton interrupt finishes, it clears the EIF1 (External Interrupt Flag 1) so that it is ready for the next interrupt.
Timer 1 Interrupt
#pragma vector = 4
__interrupt void timer1Interrupt()
{
  T2CNA1_bit.TR2 = 0;                  // Stop the timer.

  if(++count == 20)                    // Change the units occasionally.
  {
    count = 0;
    celsius = ~celsius;
  }
  readTemp();                          //Get and display the current temperature.
  T2CNB1_bit.TF2 = 0;                  //Clear the overflow flag.
  T2CNB1_bit.TCC2 = 0;                 //Clear the overflow flag.

  // output an 'alive' blip with the first decimal point, LCD0.7
  if (count & 1)
    LCD0 = LCD0 | 0x80;
  else
    LCD0 = LCD0 & 0x7F;
  T2CNA1_bit.TR2 = 1;                     // Start the timer.
}
Note: If Timer 2 is also being used, this function would be run for Timer 2's interrupts because Timer 2 is also located in module 4.Setting TR2 to 0 turns the timer off and then it checks to see if the count is equal to 20. count is used to periodically change the display from Fahrenheit to Celsius. readTemp() calls the function responsible for reading the temperature. After readTemp is finished, the flags indicating possible timer overflow (TF2 and TCC2) are cleared. The if statement checking count essentially creates a "tick" every time the temperature is checked. This "tick" is enabling or disabling a decimal point to the left of the unit character. This is useful for knowing how often and how fast it is checking, and that it is running when the temperature stays the same. Finally, the timer is started again.
Functions
The readTemp() function is responsible for reading and displaying the temperature, as well as driving the PWM.
  if(readiButtonTemp(&temp)==FALSE)   // Check to see if the device can be found
  {
    // If there is no iButton device found
    adc = getADCReading();            // Read the thermistor value.
    temp = convertToTemp(adc);        // Convert this value to degrees Celsius.
  }

  showTemp(temp);                   // Display temperature
  drivePWM(temp);                   // Update fan speed
The first thing it does is attempt to get the temperature from a 1-Wire or iButton device. If there is no valid 1-Wire temperature device or an error occurs in communication, the thermistor is used to read the temperature. Once the temperature is read, the LCD display is updated with the most current reading by calling function showTemp. After that, drivePWM changes the speed of the fan accordingly.For more information on communication with 1-Wire and iButton devices, please see the 1-Wire Public Domain Kit. This is a software development kit that contains a 1-Wire API written in C and includes the temperature example used in this application.
float convertToTemp(unsigned int adc)
{
  double temp = -0.00135477 * (double)adc + 69.17;
  return (float)temp;
}
convertToTemp converts the reading from the MAX1407 into degrees Celsius. Note that this formula gives an approximation near room temperature, and does not compensate for the thermistor's nonlinear variation over temperature.
void showTemp(int temp)
{
  LCFG_bit.DPE = 0;     // disable display.
  // Clear the display of everything but the temperature units (F or C).
  LCD0 = ( (celsius == 0) ? LCD0_PATTERN_F : LCD0_PATTERN_C);

  // clear the digits
  LCD1 = LCD2 = LCD3 = LCD4 = 0;
  if(last_state == 0)   // Display correct threshold being edited
    LCD1 = 0x08;
  else
    LCD1 = 0x01;
The first thing the showTemp function does is write the unit system to the display and then clear all digits from the display by setting the LCD registers to 0. Then it displays the over- or underscore representing the threshold to be edited through the pushbutton.
  if(celsius == 0)
  {
    temp = CtoF(temp);              // Convert to Fahrenheit
  }

  if (temp > 199)                   // If temperature is 200+
  {
      temp = temp % 200;
  }

  if(temp > 99)                     // If the temperature is 100+
  {
    show100s();                     // Show a '1' on the LCD.
    temp -= 100;                    // Adjust the temperature variable.
  }

  LCD3 = getLCDDigit(temp / 10);    // show the 10's place on the LCD
  LCD2 = getLCDDigit(temp % 10);    // show the 1's place on the LCD
  LCFG_bit.DPE = 1;                 // Enable display.
If the current unit system is Fahrenheit, the temperature is converted into Fahrenheit by function CtoF. If the temp is over 100, it displays the 1 for the 100s digit and displays the other digits on the display.drivePWM is the function that sets the power of the fan by changing the PWM compare value.
  T2CNA0_bit.TR2 = 0;              // Turn timer off
  T2CNA0_bit.T2OE0 = 0;            // Turns PWM output off
  T2CNA0_bit.T2POL0 = 0;           // Changes polarity of PWM so that it starts out off
  T2CNA0_bit.T2OE0 = 1;            // Turns PWM output on
  T2V0 = T2R0;                     // Manually reload timer value
This sequence turns off the fan and then manually reloads the timer value. Below, the code sets the actual speed of the fan. If the temperature is below the base_temp threshold then the fan is set on the lowest setting possible, otherwise it checks if the temperature is higher than the max threshold, in which case the fan is set on the highest setting. Finally, if the temperature is between the thresholds it calculates the speed of the fan based on the degree. And then the timer is turned back on.
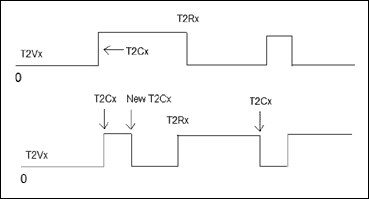
Figure 4. The top output is normal, while the bottom trace is a possibility if the timer is not stopped and reloaded manually.
It is important to disable the timer while updating the compare and reload values to avoid unintentionally inverting the output. Figure 4 shows two types of output. The top output is normal, while the bottom graph is a possibility if the timer is not stopped and reloaded manually. What happens is that the new compare value is higher than the current timer value, and when the timer finally reaches the new compare value, the port pin state is inverted and the timer continues. However, because the change in state was unwanted, it has the effect of inverting the polarity of the timer output.
  if(temp <= base_temp)           // Below this temperature the fan is off
  {
      // Force port pin P6.5 low
      PO6 &= 0xDF;
  }
  else
  {
    if( temp >= max_temp )        // Beyond this temperature the fan is full speed
    {
      // Force port pin P6.5 high
      PO6 |= 0x20;
    }
    else                         // Set the fan speed according to temperature
    {
      T2C0 = 65535 - ((temp - base_temp) * xplier);
      if( (65535 - T2C0) < MIN_TICKS)
        T2C0 = 65535 - MIN_TICKS;
      T2CNA0_bit.TR2 = 1;        // Restart timer
    }
  }
Each degree above the base_temp threshold has its own speed, which is based on the PWM duty cycle desired and the range between the two thresholds. MIN_TICKS is the minimum number of timer cycles the PWM output must be high in order for the fan to run at its lowest speed. The fan speeds linearly increase as the temperature increases. The rate of change in speeds only changes when the thresholds change. For example, the default thresholds for base_temp and max_temp are 75 and 85, respectively. That means that xplier (increase in fan speed per degree) is 1350. If the thresholds are changed to 75 and 90, respectively, then the xplier would be 900—meaning that each degree would be less of an increase in fan speed. The lower the xplier, the smoother the fan increase.
void main()
{
  initTimer1();             // Initialize timer1 for thermistor/iButton polling
  initTimer0();             // Initialize timer0 for PWM output
  init1407();               // Initialize the 1407
  initOW();                 // Initialize the 1-Wire subsystem
  initLCD();                // Initialize LCD display
  initPushButtons();        // Initialize pushbuttons

  __enable_interrupt();     // Enable global interrupts

  while(1);
}
The main function calls the initialization functions and enables the global interrupts. The program itself is interrupt driven so it sits in a while loop until an interrupt fires.Conclusion
The MAXQ2000 is a high-performance microcontroller with many useful capabilities. The temperature-driven fan-control application is an excellent example of using the MAXQ2000's PWM, 1-Wire, and SPI capabilities. When these features are combined with interactive elements such as pushbuttons and an LCD display, the number of possible applications becomes nearly unlimited.
1-Wire is a registered trademark of Maxim Integrated Products, Inc.
iButton is a registered trademark of Maxim Integrated Products, Inc.
SPI is a trademark of Motorola, Inc.