Common alarm-control panels contain several input devices and require user displays. The usual components for these systems include:
- A device to accept input from the user: a 4 x 4 switch keypad.
- A device to display output to the user: an LCD display.
- An input device: a magnetic reed switch.
- An output device: a piezoelectric horn.
- Keypad: Grayhill 16-button (4 rows by 4 columns) keypad 96BB2-006-F
- Piezoelectric horn: CEP-1172
- Magnetic reed switch: standard single-loop type
Design Goals
Our example application performs the following tasks:- Monitors the magnetic reed switch to determine if a door/window is open or closed.
- Allows the user to arm or disarm the system by entering a PIN on the keypad.
- Displays status information to the user on the LCD.
- Provides audio indications of keypresses and sensor open/close events by sounding the piezoelectric horn.
- Sounds the horn continuously if the sensor is opened while the system is armed. The behavior of the alarm control application consists of four discrete states: CLOSED, OPEN, SET, and ALERT (Figure 1).
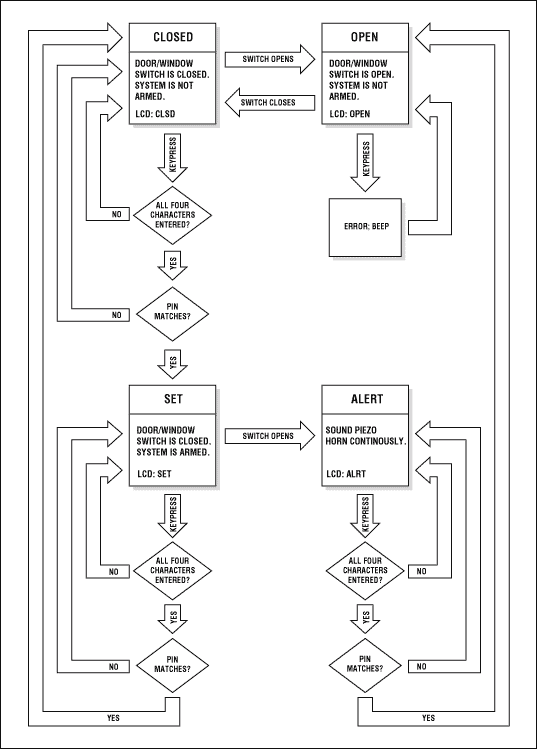
Figure 1. The alarm control application operates in four main states: CLOSED, OPEN, SET, AND ALERT.
Interfacing to the Magnetic Reed Switch
In an alarm system, magnetic reed switches are installed in two parts: a magnet and the actual reed switch. The magnet portion is placed on the moving section of a door or window, while the switch portion is placed on the frame. When the door or window is closed, the magnet closes the reed switch, indicating a nonalarming condition. If the system is armed and the window or door is opened, the reed switch changes state, allowing the MAXQ2000 to sound an intrusion alert.The reed switch is interfaced to the MAXQ2000 simply by connecting it between port pins P5.2 and P5.3. With P5.2 set to an active-low pulldown (PD = 1, PO = 0) and P5.3 set to a weak pullup input (PD = 0, PO = 1), P5.3 will read zero when the reed switch is closed and one when the reed switch is open.
   move    PD5.2, #1         ; Drive one side of reed switch LOW
   move    PO5.2, #0

   move    PD5.3, #0         ; Set weak pullup high on other side
   move    PO5.3, #1

...

ML_Closed_Check:
   move    C, PI5.3
   jump    NC, ML_Closed_L   ; Switch is closed, continue in this state

   call    ShortBeep
   call    ShortPause
   call    ShortBeep
   call    ShortPause
   call    ShortBeep
   call    ShortPause
   call    ShortBeep
   call    ShortPause
   jump    ML_Open           ; Switch is open, transition to OPEN state
Interfacing to the 4 x 4 Keypad
Keypads are used in alarm control systems for secure PIN entry, to arm/disarm the system, and to change configurations. The keypad used in this example application consists of 16 switches, organized in a 4 x 4 grid. The switches are tied together in a row and column matrix (Figure 2) so that depressing a keypad switch connects one row line to one column line. For example, depressing the "3" key connects row 1 and column 3 together.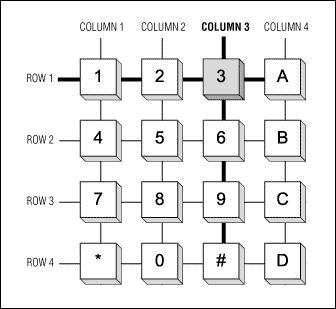
Figure 2. The keypad switches form a grid of four rows and four columns.
The keypad provides eight interface pins, one pin for each row and column of the keypad matrix. The keypad and the MAXQ2000 EV kit are connected as shown.
| Pin | Connect | Port Pin | JU2 Pin |
| 1 | Row 1 | P6.0 | 54 |
| 2 | Row 2 | P6.1 | 52 |
| 3 | Row 3 | P6.2 | 50 |
| 4 | Row 4 | P6.3 | 48 |
| 5 | Col 1 | P6.4 | 46 |
| 6 | Col 2 | P6.5 | 44 |
| 7 | Col 3 | P7.0 | 42 |
| 8 | Col 4 | P7.1 | 40 |
For this application, the EV kit board should be configured as follows.
-
DIP switches.
- The following switches must be OFF: All SW1 switches, SW3.1, SW3.7, SW3.8, SW6.1, SW6.4, SW6.5, SW6.6, SW6.7, and SW6.8.
- All other DIP switches can be in any state.
-
Jumpers
- The following jumpers must be OPEN: JU5, JU6, JU8, and JU9.
- The following jumpers must be CLOSED: JU1, JU2, JU3 and JU11.
- All other jumpers can be in any state.
Scanning by Columns
The row and column arrangement of the keypad makes it easy to read the state of four switches at any one time, on either a row or column basis. To read four switches in one column, first the line for that column must be pulled low, and all other columns tri-stated (Figure 3). Next, a weak pullup must be set on each row line. Finally, the four row lines are connected to port pin inputs. The input from a row will be low when the switch on that row is depressed, and high otherwise.Similarly, the state of four switches in a row can be read by pulling that row line low and setting inputs and weak pullups on all four columns. The rows and columns are interchangeable.
In our setup, the four row lines (keypad pins 1 through 4) are all connected to the same input port (P6[3:0]), which makes it easier to read them simultaneously. For this reason, the example application scans one column of switches at a time. There are four setup states for the eight port-pin lines connected to the keypad, each of which allows four of the switches to be read. All input lines read low when the switch being read is closed, and high when the switch is open.
| STATE | P6.0 | P6.1 | P6.2 | P6.3 | P6.4 | P6.5 | P7.0 | P7.1 |
| 1 | Input - 1 | Input - 4 | Input - 7 | Input - * | low | tri-state | tri-state | tri-state |
| 2 | Input - 2 | Input - 5 | Input - 8 | Input - 0 | tri-state | low | tri-state | tri-state |
| 3 | Input - 3 | Input - 6 | Input - 9 | Input - # | tri-state | tri-state | low | tri-state |
| 4 | Input - A | Input - B | Input - C | Input - D | tri-state | tri-state | tri-state | low |
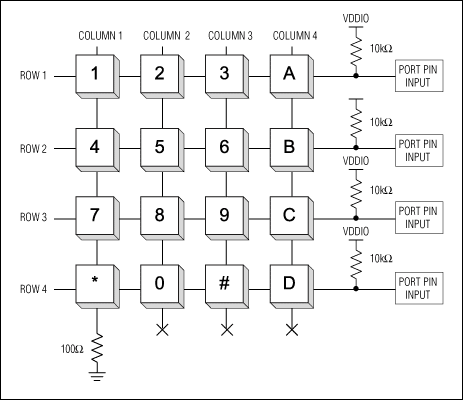
Figure 3. The MAXQ2000 pulls column 1 low to read the state of the first four keypad switches.
An Interrupt-Driven State Machine
The four columns must be strobed quickly so that any keypress has time to be read before it is released. Additionally, to prevent a switch's bouncing contacts from registering multiple presses, a key must be held down for a certain amount of time before it registers. Both of these factors can be done at once by making a timer-driven interrupt routine the heart of the application. This allows the application to scan through each one of the four columns in a periodic manner and to count the length of time a key has been depressed.RELOAD equ 0FF00h StartTimer: move IIR.3, #1 ; Enable interrupts for module 3 move IMR.3, #1 move T2V0, #RELOAD move T2R0, #0h move T2C0, #0h move Acc, T2CFG0 ; Set timer 0 to run from HFClk/128 and #08Fh or #070h move T2CFG0, Acc move T2CNA0.3, #1 ; Start timer 0 move T2CNA0.7, #1 ; Enable timer 0 interrupts retThe reload value for the timer controls how often the interrupt will fire. This value must be short enough so that all keypresses are recognized. Additionally, to ensure that key response is not sluggish, the reload value must also be long enough so that it does not occupy an excessive amount of processing time. The value 0FF00h shown above (once about every 2.4ms) was reached through experimentation.
Once the column line for a group of four switches is driven low, some time may be required for the connection operating through a depressed switch to pull its input line low. This time is affected by the switch's on-resistance and by how many column switches are depressed at once. To avoid having to delay the interrupt service routine between pulling the column line low and reading the four switches, the column line for a given state is driven low in the previous state (Figure 4).
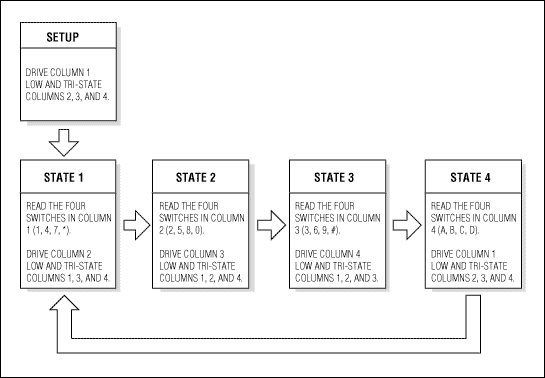
Figure 4. In each of the four key-scanning states, the application reads the status of four switches and prepares to read the next four.
Because the interrupt vector (IV) for the MAXQ2000 can be set on-the-fly, the application holds the next-state value in the interrupt vector register. Whenever the timer interrupt fires, the handler routine for the current key-scanning state sets the interrupt vector address to the next state's handler routine.
org  0000h

Main:
   call    InitializeLCD

   move    PD6, #010h         ; For state 1
   move    PO6, #00Fh         ; For all states
   move    PD7, #000h         ; For state 1
   move    PO7, #000h         ; For all states

   move    IV, #State1
   call    StartTimer
   move    IC, #1            ; Enable global interrupts

   jump    $


State1:
   push    PSF
   push    Acc

   move    Acc, PI6
   and     #000Fh            ; Grab lowest four bits only
   sla4
   move    A[13], Acc

   move    PD6, #020h        ; For state 2
   move    PD7, #000h

   move    T2V0, #RELOAD     ; Set reload value
   move    T2CNB0.1, #0      ; Clear interrupt flags
   move    T2CNB0.3, #0
   move    IV, #State2

   pop     Acc
   pop     PSF

   reti
The handler routines for the other four states are similar, with a slight adjustment to OR in the previously collected switch bits in the A[13] holding register. There are three working accumulators used by the state routines.
A[13] holds the bit array of all the switch states read on the current pass through the keypad. After the State 4 read completes, this register contains the following bits, where a one bit represents an open (released) key switch and a zero bit represents a closed (depressed) key switch.
|
BIT 15 |
BIT 14 |
BIT 13 |
BIT 12 |
BIT 11 |
BIT 10 |
BIT 9 |
BIT 8 |
BIT 7 |
BIT 6 |
BIT 5 |
BIT 4 |
BIT 3 |
BIT 2 |
BIT 1 |
BIT 0 |
| * | 7 | 4 | 1 | 2 | 5 | 8 | 0 | 3 | 6 | 9 | # | D | C | B | A |
Debouncing Switches
After State 4 is reached and all keys are scanned, a decision must be made whether to accept any keys that are pressed. A simple way to handle debouncing is to maintain a counter value for each of the 16 switches. Every time State 4 is reached and the key is pressed, the counter is incremented. If the key is not pressed, the counter is decremented. When the counter reaches a certain value, the keypress is registered. To prevent a held-down key from repeating (which typically is allowed on computer keyboards, but not on keypads), the counter must be allowed to decrement back to zero (by releasing the key) before that key may be registered again.As we have the state of all 16 keys in a single register, there is a simpler, less memory-intensive solution for debouncing. The application maintains a single counter value that is incremented each time the bit pattern matches the pattern read on the previous pass.
State4:
   push    PSF
   push    Acc

   move    Acc, PI6
   and     #000Fh            ; Grab low four bits only
   or      A[13]
   cmp     A[15]
   jump    E, State4_End    ; Ignore the last debounced pattern

   cmp     A[14]
   jump    E, State4_Match

   move    LC[0], #DEBOUNCE
   move    A[14], Acc       ; Reset current bit array
To prevent keys from repeating, once a bit pattern has been static long enough to be accepted, a different bit pattern (which includes the idle state where no keys are depressed) must be accepted before the first bit pattern can be accepted again.
Handling Simultaneous Keypresses
Simultaneous keypresses are possible when using a keypad input device. The debouncing code ensures that if a second key is pressed right after the first, the debounce interval will start over, but be short enough in practice so that this is not an issue.Once a bit pattern has been accepted, the action for each depressed-key bit can be taken by rotating all 16 bits into the carry bit individually using the accumulator and checking each in turn. The following code responds only to the first depressed key, but this could be easily changed.
State4_Match:
   djnz    LC[0], State4_End
   move    A[15], Acc       ; Reset last debounced pattern

   rrc
   jump    NC, State4_KeyA
   rrc
   jump    NC, State4_KeyB
   rrc
   jump    NC, State4_KeyC
   rrc
   jump    NC, State4_KeyD

   rrc
   jump    NC, State4_Key3
   rrc
   jump    NC, State4_Key6
   rrc
   jump    NC, State4_Key9
   rrc
   jump    NC, State4_KeyPound

   rrc
   jump    NC, State4_Key2
   rrc
   jump    NC, State4_Key5
   rrc
   jump    NC, State4_Key8
   rrc
   jump    NC, State4_Key0

   rrc
   jump    NC, State4_Key1
   rrc
   jump    NC, State4_Key4
   rrc
   jump    NC, State4_Key7
   rrc
   jump    NC, State4_KeyStar

   jump    State4_End
Interfacing to the LCD Display
The LCD display included with the MAXQ2000 EV kit has segments defined as shown (Figure 5).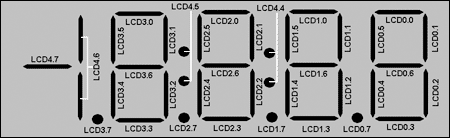
Figure 5. The LCD display contains four-and-a-half 7-segment characters.
First, the LCD display must be initialized to static drive mode and enabled. Once this has been done, characters can be written to the display by setting segments appropriately.
InitializeLCD:
   move    LCRA, #03E0h      ; xxx0001111100000
                             ;    00            - DUTY : Static
                             ;      0111        - FRM  : Frame freq
                             ;          1       - LCCS : HFClk / 128
                             ;           1      - LRIG : Ground VADJ
                             ;            00000 - LRA  : RADJ = max

   move    LCFG, #0F3h       ; 1111xx11
                             ; 1111     - PCF  : All segments enabled
                             ;       1  - OPM  : Normal operation
                             ;        1 - DPE  : Display enabled

   move    LCD0, #00h        ; Clear all segments
   move    LCD1, #00h
   move    LCD2, #00h
   move    LCD3, #00h
   move    LCD4, #00h
   ret
Entering the PIN
In the CLOSED, SET, and ALERT states, a PIN can be entered to change the alarm controller to another state. As each character is entered, the working value held in A[10] is shifted left and ORed with the new character, and the decimal point on the LCD display moves left to indicate the number of characters entered. For security reasons, the PIN being entered is not shown on the display.
State4_Key0:
   move    Acc, #0000h
   jump    State4_Shift

State4_Key1:
   move    Acc, #0001h
   jump    State4_Shift

State4_Key2:
   move    Acc, #0002h
   jump    State4_Shift

....

State4_Shift:
   move    A[12], Acc

   move    Acc, A[10]
   cmp     #0FFFFh         ; flag indicating no PIN entry allowed
                           ;    in current state
   jump    E, State4_NoKey

   move    Acc, A[11]      ; key count
   cmp     #04             ; if already at 4 (should have been cleared)
   jump    E, State4_NoKey

   add     #1
   move    A[11], Acc

   move    Acc, A[10]
   sla4
   or      A[12]
   move    A[10], Acc
Once all four characters are entered, the PIN is checked against a hard-coded value. If the entered value matches the PIN, the appropriate state transition occurs.
PIN_VALUE        equ 03870h       ; Just a random number

;; "Closed" state code

ML_Closed:
   move    A[10], #00000h         ; Reset PIN value
   move    A[11], #0              ; Reset number of PIN chars entered

   move    LCD3, #LCD_CHAR_C
   move    LCD2, #LCD_CHAR_L
   move    LCD1, #LCD_CHAR_5
   move    LCD0, #LCD_CHAR_D

ML_Closed_L:
   move    Acc, A[11]
   cmp     #4                     ; 4 characters entered?
   jump    NE, ML_Closed_Check

   move    Acc, A[10]
   cmp     #PIN_VALUE             ; PIN matches?
   jump    E, ML_Set

   call    LongBeep               ; Beep on incorrect PIN and reset
   move    A[10], #0000h
   move    A[11], #0
   move    LCD3.7, #0

ML_Closed_Check:
   move    C, PI5.3               ; Check reed switch
   jump    NC, ML_Closed_L        ; Closed, stay in current state

   call    ShortBeep              ; 4 short beeps signal transition
   call    ShortPause
   call    ShortBeep
   call    ShortPause
   call    ShortBeep
   call    ShortPause
   call    ShortBeep
   call    ShortPause
   jump    ML_Open                ; Switch opened, go to OPEN state
Using the Piezoelectric Horn
In our application, a small piezoelectric horn is used to perform two functions: (1) provide audio feedback when keys are pressed or when an incorrect PIN is entered, and (2) sound an alarm when the reed switch opens while the system is armed.For demonstration purposes, a small piezoelectric horn can be interfaced with the MAXQ2000 by connecting it between two port pins. The port pins are driven differentially to increase the current drive to the piezoelectric horn, and the loop counts used in the driver code determine the frequency of the tone emitted.
ShortBeep:
   move    LC[1], #100       ; Number of cycles
SB_L1:
   move    PO5.6, #0
   move    PO5.7, #1

   move    Acc, #2000        ; Count for forward polarity period
SB_L2:
   sub     #1
   jump    NZ, SB_L2

   move    PO5.6, #1
   move    PO5.7, #0

   move    Acc, #2000        ; Count for reverse polarity period
SB_L3:
   sub     #1
   jump    NZ, SB_L3

   djnz    LC[1], SB_L1
   ret
In an actual alarm system, stronger drive circuitry would be used to run the piezoelectric horn, and the horn would be driven at its resonant frequency to increase the volume.
Conclusion
The MAXQ2000 interfaces easily and directly to LCD displays by means of its dedicated LCD controller peripheral. Multiplexed keypads can be read in a straightforward manner using the flexible port-pin configuration provided by the MAXQ2000. A timer-interrupt-driven state machine allows all keys in the matrix to be scanned and debounced with minimal effect on processor overhead. Finally, a piezoelectric horn and magnetic reed switch can be controlled easily as well, using the general-purpose port pins available on the MAXQ2000.This article appears in the MER Vol 5.